As the leaves change color and the air grows crisp, it's time to embrace the cozy atmosphere of the fall and winter seasons. One of the best ways to celebrate these holidays is through crafting. Whether you love the spooky Halloween vibe or you want to craft festive Christmas ornaments – or maybe you love both! There's a DIY project out there for everyone. Let's dive into some creative ideas to get you started.
Autumn Adornments: Crafting Cozy Fall Decor
DIY Leaf Garlands and Wreaths
- Gather the Harvest: Gather real or faux leaves in various colors and sizes.
- Create a Garland: Use twine or ribbon to tie the leaves or the stem of the leaves together to form a garland or wreath.
- Extra autumn, Please: Add other autumnal elements like pinecones, acorns, or berries for extra texture and interest.
- Time to Hang: Hang your garland or wreath on a door, window, or mantelpiece.
Mason Jar Centerpieces
- Use Autumnal Elements: Fill mason jars with autumnal elements like acorns, pinecones, citrus fruits or dried leaves.
- Light it Up, Softly: Add candles or fairy lights for a warm glow.
- Pretty it Up: Decorate the jars with ribbon, twine, or paint.
- Make them a Centerpiece: Place the jars on your dining table or mantel as a centerpiece.
Pumpkin Projects
- Lots of Pumpkins: Choose pumpkins, interesting gourds or pie pumpkins of various sizes and shapes.
- Get Creative with Your Pumpkin: Paint pumpkins with your favorite colors or designs. Consider using stencils or templates.
- Embellish: Add glitter, sequins, or stickers for extra sparkle.
- Draw Your Own Designs: Create unique, non-carved pumpkin designs for a festive touch.
These DIY projects are a fun and affordable way to welcome fall charm into your home. With a little creativity and imagination, you can create beautiful and personalized decorations that will brighten your autumn days.
Spooktacular Halloween Crafts
Homemade Halloween Costumes
- Popular Characters: Create easy costumes for kids and adults based on popular characters like witches, ghosts, vampires, and superheroes.
- DIY Halloween: Use everyday items and a little creativity to make unique costumes, such as a pirate captain using a bandana and an eye patch.
- No Sew Options: For those who aren't comfortable with sewing, explore no-sew costume ideas using glue, tape, or safety pins.
Spooky Yard Decorations
- Haunted House Props: Build a haunted house facade using cardboard boxes, paint, and spooky decorations like cobwebs and fake bats.
- Tombstones: Create realistic tombstones using foam board, paint, and markers.
- Ghostly Figures: Make ghostly figures using white sheets, string lights, and a little imagination.
- Scarecrows: Dress up scarecrows in spooky costumes and place them in your yard to ward off trick-or-treaters and keep all the candy yourself!
Trick-or-Treat Bags
- Personalize Fabric Bags or Pillowcases: Choose fabric with Halloween-themed patterns or colors.
- Add Decorations: Decorate your bags with patches, iron-on transfers, or hand-painted designs.
- Create a Custom Handle: Attach a unique handle to your bag using ribbon or fabric.
- Fill with Halloween Treats: Prepare your bags with a variety of Halloween candies and treats for trick-or-treaters.
Who doesn’t love a little Halloween crafting? Children who might be a little ‘spooked’ about the holiday might also find some fun and calm by preparing these DIY Halloween crafts.

Thanksgiving Table Decor and Favors
Gratitude Trees
- Gather Branches and Paper Leaves: Collect branches of different sizes and shapes, as well as paper leaves in various colors.
- Assemble the Tree: Arrange the branches in a tree-like shape, securing them with tape or twine.
- Write Messages of Gratitude: Encourage family members to write messages of what they are thankful for on all of the paper leaves. Some inspiration for this include: family, pets, health, creativity, God, being together, jobs, home, friends, nature, etc.
- Hang the Leaves on the Tree: Attach the leaves to the branches using string or ribbon.
- Display the Gratitude Tree: Place the tree on a mantel or table as a centerpiece.
DIY Place Cards
- Gather Fall Items: Collect autumn leaves, mini pumpkins, acorns, or other seasonal items.
- Cut Paper into Small Squares: Prepare small squares of paper for your place cards.
- Decorate the Paper: Use markers, pens, or stamps to decorate the paper with fall-themed designs.
- Attach the Fall Items: Glue or tape the fall items to the decorated paper squares.
- Write Names on the Place Cards: Write the names of guests on the place cards.
Thanksgiving Centerpieces
- Choose Seasonal Flowers: Select flowers in autumn colors like orange, red, and yellow.
- Add Candles for a Warm Glow: Use candles of different heights and sizes to create a cozy atmosphere.
- Integrate Harvest Elements: Include cornucopias, pumpkins, or wheat sheaves for a traditional Thanksgiving feel.
- Arrange the Elements: Combine the flowers, candles, and harvest items to create a beautiful centerpiece.
- Place the Centerpiece on the Table: Position the centerpiece in the middle of your dining table.
Adding your own personal flair to your dining room table with these fun DIY projects will enhance the feeling of gratitude, and that is what Thanksgiving is all about!
Christmas Countdown: Advent Calendars and More
DIY Advent Calendars
- Envelope Calendars: Create a simple yet effective calendar by using envelopes numbered from 1 to 25. Fill each envelope with a small, fun gift or activity.
- Box Calendars: Use small boxes or containers to create a more decorative calendar. Number the boxes and fill them with treats, toys, or notes.
- Fabric Calendars: Sew or glue pockets onto a piece of fabric and fill them with small surprises.
Homemade Ornaments
- Clay Ornaments: Mold clay into various shapes and sizes. Paint or decorate the ornaments with glitter, markers, or stickers.
- Wooden Ornaments: Use wooden slices or blocks to create unique ornaments. Paint or carve designs onto the wood.
- Fabric Ornaments: Sew or glue fabric scraps into festive shapes like stars, snowflakes, or hearts.
- Personalized Ornaments: Add a personal touch by writing names or dates or gluing photos on the ornaments.
Holiday Wreaths
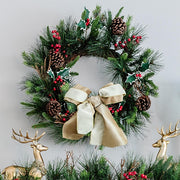
- Evergreen Wreaths: Use fresh or faux evergreen branches to create a traditional wreath.
- Ribbon and Ornaments: Decorate the wreath with ribbons, bows, and festive ornaments.
- DIY Wreaths: Create unique wreaths using materials like pine cones, cinnamon sticks, or dried oranges.
- Door Hangers: Hang the wreath on your front door to welcome guests during the holiday season.
Additional Christmas Crafting Ideas
- Paper Crafts: Make paper snowflakes, ornaments, or cards. Consider using vintage images for a sweet, rustic feel. This is also a great way to recycle old Christmas cards.
- Knitting and Crocheting: Create cozy knitted or crocheted items like scarves, hats, or mittens.
- Baking: Bake festive treats like cookies, gingerbread houses, or candy canes.
- Gift Wrapping: Wrap presents in festive wrapping paper (this also can be handmade with plain paper and watercolors, stamps, and stickers) and add homemade gift tags.
Personalized decorations and gifts put that special touch back into your Christmas, and will create fulfillment throughout the entire process, including the end result!
Winter Wonderland: Festive Christmas Crafts
Snow Globe Jars
- Gather Materials: Collect mason jars, glitter, and small holiday figurines or decorations. If you want to glue the figurine to the bottom of the Mason jar, be sure to use waterproof glue.
- Fill the Jar: Fill the bottom of the jar with a layer of glycerin.
- Add Glitter: Sprinkle glitter over the glycerin layer.
- Place the Figurine: Carefully place your chosen figurine in the jar.
- Fill the Jar with Water: Fill the jar with water, leaving a small amount of space at the top.
- Seal the Jar: Securely seal the jar with a lid.
- Shake the Jar and Enjoy: Gently shake the jar to distribute the glitter and create a snow effect.
Christmas Stockings
- Choose the Fabric: Select fabric that is suitable for stockings, such as felt, flannel, or burlap.
- Cut the Fabric: Cut the fabric into the desired shape and size for your stockings.
- Sew the Sides: Sew the sides of the fabric together, leaving an opening at the top.
- Decorate the Stockings: Add decorations like ribbons, bows, bells, or appliqués.
- Personalize the Stockings: Embroider names or initials on the stockings for a personal touch.
- Fill the Stockings with Treats: Fill the stockings with small gifts, candies, or other surprises.
Gift Wrapping Stations
- Gather Supplies: Collect wrapping paper, ribbons, bows, gift tags, and scissors.
- Set up a Dedicated Workspace: Create a designated area for wrapping presents.
- Organize Materials: Arrange your supplies in an organized manner for easy access.
- Encourage Creativity: Provide a variety of wrapping paper, ribbons, and decorations.
- Add a Personal Touch: Write personalized messages on gift tags. This is a good way for kids to express themselves during the season.
- Enjoy the Wrapping Process: Make wrapping presents a fun and festive activity for the whole family.
These DIY crafting ideas are just a starting point. With an extra dash of creativity and imagination, you can come up with countless other projects to celebrate the fall and winter holidays. The most important thing is to have fun and enjoy the process of creating something unique and personalized. Don’t worry about making mistakes, unleash your creativity! By incorporating these DIY crafts into your holiday celebrations, you can add a touch of warmth, joy, and creativity to your home. Go ahead and gather your supplies, get crafty, and make this holiday season truly memorable. Remember, the best part about DIY crafts is that you express your own personal style and create one-of-a-kind decorations that will be cherished for many years to come.


